Reading on a device can be much more appealing to some students. It can engage them and motivate them in ways that traditional books do not. In addition, it can provide accessibility features that promote comprehension, processing and independence. Book Creator is an app that allows you to create a variety of robust reading materials. […]
Category: Nicole’s Nook
Nicole’s Nook: ModMath Upgrade Highlights
In this month’s Nicole’s Nook blog, Nicole Weckherlin, OTR/L reviews a previously recommended app that makes completing math worksheets on the iPad easier. Doing math on the iPad is a common challenge for children, and this app allows children to plot out their work in a much more legible and visual platform. New upgrades provide additional features, such as importing worksheets and adding notes to math homework.
Nicole’s Nook: Read, Markup & Share PDFs with iAnnotate
In this month’s Nicole’s Nook, Nicole Weckherlin, St. Louis Children’s Hospital Occupational Therapist, highlights one of her favorite apps, iAnnotate, for reading, annotating, and sharing PDFs.
Nicole’s Nook: Taking Notes & Recording With AudioNote
Taking notes in class can be challenging and frustrating for many students with NF1 who may have diminished fine motor skills and struggle with learning and attention deficits. In this month’s Nicole’s Nook, Nicole Weckherlin, St. Louis Children’s Hospital Occupational Therapist, discusses how to use AudioNote, an app used to record lectures, and take handwritten notes.
Nicole’s Nook: Apple iPad Accessibility Features
In this month’s Nicole’s Nook, Nicole Weckherlin, St. Louis Children’s Hospital Occupational Therapist, discusses Apple’s built-in accessibility features which make reading, typing and navigating the iPad easier and faster.
Nicole’s Nook: Chromebooks as a Learning Tool
In this month’s Nicole’s Nook, learn more about the accessibility features and functionality of the Chromebook. St. Louis Children’s Hospital Occupational Therapist, Nicole Weckherlin, OTR/L, provides tips and tricks to help your child make the most of their Chromebook experience.
Nicole’s Nook: GoWorksheet to Enhance Learning
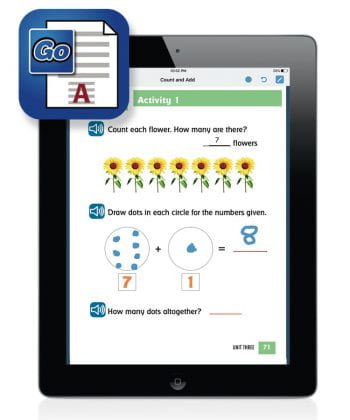
It’s back to school time and I want to introduce a new productivity app that can benefit many students. Some children with fine motor challenges have trouble with conventional pencil and paper worksheets. These children can use GoWorksheet to do their schoolwork on an iPad. This app allows them to focus on the content presented […]
Nicole’s Nook: Journaling with myMemoir
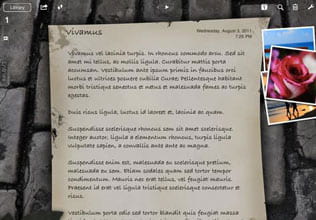
In this month’s blog, Nicole Weckherlin, OTR/L reviews another one of her favorite apps, myMemoir. Many children start or end their school day with journaling, and this very simple app enables them to complete that task on the iPad, thus eliminating some of the fine motor demands which children with NF1 often struggle with.
Nicole’s Nook: Doing Math on the iPad
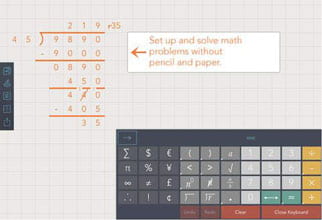
In this month’s Nicole’s Nook blog, Nicole Weckherlin, OTR/L recommends an app that makes completing math worksheets on the iPad easier. Doing math on the iPad is a common challenge for children, and this app allows children to plot out their work in a much more legible and visual platform.
Team NF Member Earns St. Louis Children’s Hospital President’s Award

The Washington University NF Center congratulates our fellow team member, Nicole Weckherlin, OTR/L, St. Louis Children’s Hospital Occupational Therapist, on her recent accomplishment of earning the St. Louis Children’s Hospital President’s Award!
Nicole’s Nook: Visual Scheduling with Choiceworks
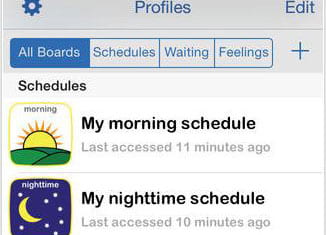
For children with NF1, a visual schedule provides structure and a feeling of control over their environment, increasing completion of daily tasks and transitions. St. Louis Children’s Hospital OT, Nicole Weckherlin, recommends the Choiceworks app to address these concerns.
Nicole’s Nook: SnapType Eases Handwriting Struggles

Do struggles with fine motor skills affect your child’s ability to complete homework assignments? In this month’s blog, St. Louis Children’s Hospital OT, Nicole Weckherlin, OTR/L, provides information about SnapType, an easy-to-use, kid-friendly app that allows children to complete worksheets on an iPad.
Nicole’s Nook: Easily Share Files on Your iPad
As we are now well into the school year and parent/teacher conferences have just been (or will soon be) held, many families may be reevaluating their student’s progress and ability to accomplish their school-related tasks. The iPad may play a key role in your child’s school day, but printing and sharing work is often a […]
Nicole’s Nook: Handwriting Made Easier
Handwriting can be difficult, fatiguing, and frustrating for many children, especially in children with NF1. Often times it adversely affects their schoolwork and overall academic performance. While handwriting is a very functional skill, minimizing such fine motor demands can be a reasonable accommodation to increase productivity and success. The iPad features several options to ease […]
Nicole’s Nook: Back to School Apps
Heading back to school in the fall is a very exciting time, but it can also bring about anxiety and stress for children with NF1 who frequently struggle with fine motor skills, organization and/or executive functioning. However, the use of technology can alleviate many of these concerns and assist children and adults in becoming more productive, […]
Nicole’s Nook: iPad Accessibility Features
With each new operating system release, iPads have become increasingly more powerful, yet have also remained extremely user-friendly. Adults and children alike are able to browse the web, access content, play games and more through a simple swipe, pinch or tap. With a pinch in different directions, the pressing of a button, rapid double-tap or […]
Nicole’s Nook: Summer App Recommendations
The summer months are an excellent time for you and your children to enjoy outdoor activities like swimming, bike riding and camping. However, after a few weeks, when the novelty of being out of school has worn off, children can start to get restless. To assist you in your quest to keep your children busy in a productive manner this […]
Nicole’s Nook: Third Party Keyboard Use Finally Introduced in iOS8!
One of the most significant new features of iOS8 is the option to download and use third party keyboards. Essentially, it allows for what many of us have been eagerly awaiting, the ability to use an app within an app. You can now replace the standard built-in keyboard with other custom and specialized keyboards available […]
Nicole’s Nook: Improving Behavior with Social Stories & Visual Schedules
The iPad can serve as a useful behavior modification tool, not necessarily in terms of using it as a reward or reinforcer, but to provide social stories and visual schedules. For many children, anxiety can play a large part in their poor behavior. That anxiety can stem from the unknown, the unpredictable nature of life, […]
Nicole’s Nook: Reading Made Easier with Tablets
Reading on an iPad (or tablet), versus traditional paper or books, can be a much simpler and more enjoyable process for many people. Specifically, iPads have numerous features incorporated to assist those who experience visual, auditory and other processing issues while reading. Some of these assistive features include: VoiceOver: speaks items on screen, gesture-based screen […]